This is about my cooking adventures as I try new recipes and do food related things.
Everyone eats, so let's have fun cooking!

Saturday, July 25, 2015

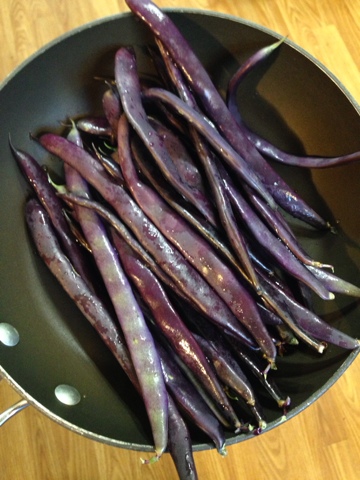
Quick Healthy Snack: Purple Pole Beans

I love vegetables. Well, most vegetables. Brussels sprouts can gtfo. 

One of my favorite vegetables are green beans, also called pole beans and snap beans. 
In this case my beans aren't actually green, they're purple. 

They look a little big, huh? No problem, in fact for the way I plan to cook them it's actually a good thing.

First, snap off each end. 


Next, French cut each bean.

When you've finished slicing add them to your pan.

Add salt, pepper, and butter to taste - you won't need much. Then cook over medium heat. Normally you cook a green bean until it's bright green and still has a little crunch when you bite. Good news! Purple beans actually turn green as they cook!

Magic vegetables. Eat and enjoy!

Monday, July 28, 2014

Surf N Turf

When I was at the grocery store last I made an impulse purchase of crab ravioli. When I got them home I realized I didn't know what I was going to do with them. Crap. So I consulted google for the best sauce to use with crab filled ravioli. The consensus seemed to be a light creamy wine sauce. Awesome, that sounds delicious and I know how to make it! You do too, because I shared how to make it back in 2011. However, I will share that I have since learned that it is called a Béchamel sauce, one of the mother sauces of French cooking. What I had been calling a creamy Alfredo was actually a variation of Béchamel sauce called a Mornay sauce, which is Béchamel with cheese. Yay French cooking terms lesson!

Okay so far on the menu I had crab ravioli with a light creamy wine sauce. What to serve with it? Obviously the answer is steak. Top sirloin! I love a nice lean steak, seared and cooked medium. But we can't eat only meat and pasta, though my husband probably wouldn't mind, so I needed to add some veggies to this meal. So a simple salad and pan fried broccoli.

This was super simple to prepare and so delicious when it was done. Boil the ravioli and drain while searing the steak. A little salt and pepper is all I use on steak, these were small sized since we also had ravioli so just about 3 minutes per side and they were done. Always remember to remove steak from the heat source and allow them to rest before cutting. This ensures they stay juicy - no one likes dried up steak. So out of the pan come the steaks and into the pan goes the broccoli with a little butter. Stir so it doesn't burn and cook until crisp tender.

Everything is ready except the sauce! Prepared a roux and when it was ready I added 1/2 cup white wine, 1/4 cup chicken broth and 1/4 cup milk and a couple chopped green onions. Once that was all mixed up I added 1/4 cup Parmesan cheese. Add ravioli and gently stir to coat so they don't break open.

The salad was super simple, chopped romaine with cherry tomatoes and thinly sliced carrots with a sprinkle of fresh Parmesan. He had ranch and I had French dressing.

So there you have it, a well rounded surf and turf meal. Crab ravioli, steak, broccoli and a simple salad. Everything garnished with fresh snipped chives from the garden.
Thursday, July 3, 2014

Everyone Should Know: How to Start Charcoal for the Grill

As I said in the title, knowing how to start charcoal for the grill is something everyone should know. The method I will describe uses a chimney starter and works for both natural lump charcoal and charcoal briquettes - no lighter fluid involved!

So what do you need to get started? Well, you definitely need a charcoal grill. You can get a super nice one which will be sturdy and heavy duty but will also be very expensive. You can also get a more economical version (even dollar stores sell them) that will probably be smaller and less durable. There are even table top versions available! So, get yourself a charcoal grill as the first step.

The next item required is a charcoal chimney starter. They look like this. They are pretty reasonable in price, but you can also DIY one if you are so inclined.

Then the last three items are charcoal, paper and matches or a lighter.

Place your chimney starter in the bottom of your grill (if it fits) or on the ground where there is no risk of fire (so not in a dried up field or anything, okay?). Fill the bottom portion with a few pieces of crumpled paper (last week's newspaper works well, or junk mail that doesn't have plastic coating or plastic windows) and fill the top portion of the chimney with charcoal.

Use your matches or lighter to start the paper on fire. You may need to fan the bottom a little bit to get the paper going. The paper should catch the charcoal pretty quickly, not more than a couple of minutes. Now, don't touch it or mess with it, just let it catch fire. The flame will leap up over the top of the chimney, this is cool. The coals are ready when they have a coating of white ash and there is minimal white smoke. Dump them into your grill and spread them with a non-flammable item.

You are ready to grill using charcoal!

Tuesday, June 24, 2014

Cooking on High: Artichoke Chicken

More than anything for this recipe I have photos. So take a photographic journey with me. 

For the side dish I made purple potatoes. They are very pretty but I didn't really notice any particular difference in flavor. They are all around fun and add some nice color to the plate. 

After a few minutes steaming to get them started, I pan fried them with some butter and garlic. 

This is a fairly simple chicken dish, you fry chicken in olive oil and then top it with this artichoke-cheese-stuff and finish it off under the broiler. 
The artichoke-cheese-stuff is a mixture of chopped artichoke hearts (I use the marinated in oil kind and chop them up with the Food Chopper), mayonnaise and Parmesan cheese. Now, if you know me, you know that I truly despise mayonnaise, I think it just tastes terrible and I don't like it at all. So I figured I've already ruined this stuff but I can always scrape it off later. 

How wrong I was! This was crazily delicious. Something happens during the broiling process that turns this weird looking stuff into the best thing that has happened to chicken since we figured out it tastes amazing fried. And everyone knows how delicious fried chicken is.

Frying the chicken in olive oil is easy. Flatten it to uniform thickness of about 1/2 inch with meat tenderizer (looks sort of like a mallet). 

Fry four minutes per side and it should be cooked through and still juicy and delicious. 

I seasoned with just salt and pepper to keep it simple since I was going to add the artichoke topping. 


Frying the second side and it already looks sooooo good! I love that nice crisp crust that you can only get from frying. I added a bit of rosemary at this point because rosemary is delicious and I can never let anything be. 

That's why I never do crock pot cooking, because I always want to mess with it: add stuff, stir, poke at it. It's also why I love 30-Minute recipes. 


I left the chicken in the pan and added the artichoke mixture to the top and spread it to cover the chicken. Then I put it under the broiler for about 5 minutes. This is a stainless steel pan so it's safe under the broiler. It gets VERY hot! I burned my finger taking it out of the oven. So be super careful and in addition to using a pot holder maybe use an oven mitt or something too. 

The finished product! It's stupidly delicious. I recommend this recipe to everyone! And I will definitely make it again. 

Sunday, June 30, 2013

Albright Shores Summer Shopping Fair


Local Businesses
Independent Consultants
Home Crafters

All sharing their business, products and ideas with you! Come see what we're all so excited about - there will be prizes, shopping and fun :)
Free admission

Facebook:
http://tinyurl.com/AlbrightSummerFB
Google+:
http://tinyurl.com/AlbrightSummer

Anyone local who reads this, I'd love to see you there at the first ever Albright Shores Summer Shopping Fair! Located at Billings Township Hall (1050 Estey Road, Beaverton, MI 48612)

If you are a business owner, independent consultant or home crafter and would like to participate in this event please contact me right away! There are still spaces open for you!
Please share this event with your friends and family to ensure the best turnout possible!

Thursday, June 27, 2013

A Little Twist

This blog has been neglected. I am sorry.
I am going to make a couple changes about what content I will be posting. Instead of just blogging about recipes and my successes (or failures) in the kitchen I will also be posting about my everyday adventures (and misadventures).
I will hopefully add more meaningful and interesting content in this fashion.

Wednesday, June 26, 2013

Poaching Eggs: An Ordeal?

We eat a lot of eggs. I make them all sorts of ways: boiled, fried, scrambled, omelet-ed. But one way I didn't know how to make them was poached. I know, how could I have this glaring lack of knowledge concerning egg-cookery?

So my education began. I googled it AND read the egg section of my cookbook. My first attempt yielded eggs with a white consistency closer to egg drop soup than to a poached egg. Fail. Second attemp was a little better, but my eggs still had tentacles.Unfortunate. After that I had better luck but my eggs still weren't turning out as attractive as I would have liked them.

Then: my fave cookware company came out with a new stone. Holy tomatoes! It's a microwave egg cooker. When I first heard of it I was like, "What? Why?" Then I learned I could poach eggs with it. I was interested.


So I got my new stone (for free because I'm awesome and I get free samples of new stuff as a consultant). Instructions: Crack an egg into each well of the stone then add 1/3 cup water, microwave, covered, for about 2 minutes. Easy enough.

So I followed the directions... and my eggs were BEAUTIFUL! Photographic evidence.


And as good as they were, I couldn't help wondering if they'd be better cooked in broth. So, of course, I tried that next. I was right, they were better.